Ceiva-Linux mini-HOWTO

Maintained by Brad Parker (brad at heeltoe dot com)

Note:This was previously maintained by Colin Cross (colincross at bigfoot dot com). Colin seems to have gone off to do other things so as courtesy others I've grabbed his pages here. Thanks colin!

This is a quick introduction to putting Linux on a Poloaroid/Ceiva PhotoMax Digital Picture Frame. Basic framebuffer support is now included (no memory mapping yet)

NOTE: This HOWTO assumes you're a kernel hacker

Introduction to the Ceiva

The Ceiva is basically an LCD screen in a picture frame. It has a Cirrus Logic Maverick processor (the EP7212), which is based on an ARM720T core. It has 4MB of DRAM, and 2MB of Flash. Its normal communications method is through a phone line, using a softmodem running on the ARM chip. We will need a serial link to the CPU, which can be done without much trouble. By shorting the two pins of J10, we can place the CPU in "Boot ROM mode", in which it boots off an internal ROM, and then downloads 2KB of code through the serial port and executes it.

Hardware modifications

Very little hardware is necessary. You will most likely need a serial transceiver IC, such as the Maxim MAX233, which will convert between the 0-5V logic levels that the CPU uses and the +-12V that RS232 serial ports expect. You will also need a DB9 connector for your serial port and a SPST switch. Details on this circuit may follow in the future, but for now just look at the datasheet.


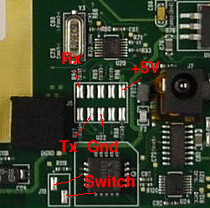
The serial connections should be made to the solder pads of J5, as shown here. The +5V can be used to power the MAX233. Tx and Rx are relative to the embedded CPU, so the Tx pad should be connected (through the MAX233) to the Rx pin on the DB9 connector. The switch is needed to short the two pins of J10 to put the CPU in Boot ROM Mode. If everything is working, setting your serial port to 9600 8N1 and leaving the pins of J10 unshorted, you should see a boot message when you turn on the picture frame. Shorting J10 and power cycling the Ceiva you should see a single '<' character.

Arm-linux toolchain

You will need an arm-linux cross-compiler. This involves downloading and compiling bin-utils as a cross-compiler, as well as downloading and compiling gcc as a cross-compiler. To compile gcc, you will need a configured (but not compiled) ARM kernel. Download the regular kernel sources, and then apply the patches from the ARM Linux project. Creating a cross-compiler is beyond the scope of this document, and described well in the cross-compiler mini howto.

ARM Kernel

Once you have gcc compiled, compile your ARM kernel. Apply this patch against arm-linux-kernel-2.4.19-rmk4. The patch includes support for the Flash chips on the Ceiva, and support for the framebuffer. You'll need the EP721x-based system type and the EDB7211 implementation under "System Type", and support for a console on the CLPS711X serial port. You'll also need MTD support. You also see my .config file.

Root FS Image

Download and cross-compile uClibc and BusyBox, which are tiny implementations of libc and of all the basic Linux commands. Install them into a temporary directory and use mkcramfs to turn it into a compressed image that will eventually be the (read-only) root image of your Ceiva. Alternatively, you can download a tarball of my rootfs and work from that. You'll need to add an image viewer (I'm working with one called fbv, look for it on freshmeat). You'll need to install uClibc on your host computer if you want to build software for the Ceiva.

Shoehorn

Shoehorn is a bootstrap loader maintained by Mike Touloumtzis for the EP7211, which is similar enough to the EP7212 for our purposes. It is used to download a bootmode version of the Hermit bootloader into RAM. You will need to obtain it from Blue Mug.

Hermit

Hermit is a bootloader, kind of like LILO for x86 PCs. It also supports uploading new data to the Flash to boot from. It has two parts, a target-side image that runs on the Ceiva, and a host-side executable that sends data and commands to the target side. We will actually need two versions of the target-side image, one which is uploaded by Shoehorn into RAM and executed, which then uploads the second version into Flash memory.

Hermit is also maintained by Mike Touloumtzis, however his version only supports the EP7211. You will need a modified version that supports the Ceiva. This version also supports a -F flag to use 115200 baud instead of 9600 baud, although this selection must be compiled in to the target-side images. By default, the bootmode image uses 9600 (because Shoehorn does), and the second image uses 115200. You will need to edit the top directory Makefile to set your install prefix. To compile and install the bootmode target-side image and the host executable, use:

make TARGET=ceiva PROFILE=ceiva-boot scrub install

To compile the second image, use:
make TARGET=ceiva PROFILE=ceiva scrub install

This should leave the files loader-ceiva.bin and loader-ceiva-boot.bin in the lib/hermit/ under your install prefix, and the hermit executable in bin/.
To install Hermit onto your Ceiva, connect the Ceiva to your serial port, put the Ceiva in bootmode (short the pins of J10), and turn on the Ceiva.

Continuing

There are still a few bugs in the framebuffer code (copy_from_user16 mishandles unaligned data, I think), and code that memory maps the framebuffer MUST be hacked to only use 16 bit accesses to the framebuffer (unsigned int pointers to the framebuffer). There is no way around this that I know of due to the fact that the Ceiva designers did not implement 32 bit access to the LCD controller.

Rob Scott has added real support for the Ceiva with actual configuration options to the 2.5 series kernels, but I've had trouble with memory use. My framebuffer changes need to be ported to 2.5, which I will do unless someone beats me to it.


Brad Parker 5/4/2004